Being able to shoot quickly is important for street photography. It’s important for both efficiency and discretion. You point, shoot and move on. You can switch instantly, without any change to your settings, from one subject to another. Here’s how to point and shoot with your GR III without using the automatic mode (P). You can also use the general guidelines in this blog post if you own another camera.
The Zone Focus Technique
As its name implies, this technique is about focusing preemptively on a zone. Let’s say you’re going to focus mainly on relatively close subjects and you don’t want a sharp background. You set the focus from 1 to 3 meters and voila! All you have to do now is to point and shoot your subjects. I’ve preferred this technique to Ricoh’s Snap Focus because I felt it was giving me more flexibility. Read on to learn how to set up your GR III.
Set up Your GR III to use the Zone Focus
Select the Av Mode
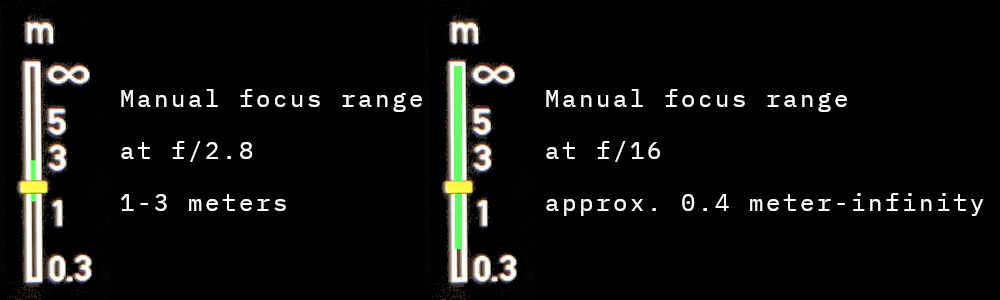
To use the zone focus technique you’re going to choose the Av (Aperture Priority) mode. With the Av mode, you control the aperture’s opening. Your GR III will automatically determine the right shutter speed. Changing the aperture will affect the focus range (e.g. 1-3 meters). The wider the aperture’s opening the shorter the focus range. The tighter the aperture’s opening the longer the focus range (e.g. 40cm-infinity). This will give you some flexibility when you’ll be out with your camera.
Select Manual Focus
To zone focus, you’ll need to use the manual focus on your GR III. (Menu > Still Image Settings > Focus.) It’s really simple to use. The focus range is indicated on the focus bar on the left of the screen. Once you’re into manual focus, push the Macro button (with the flower icon) to change the focus. Just rotate the control dial to increase or decrease the focus range. Push the ok button once you’re finished.
Enable Auto ISO
Using auto ISO is really important. This is going to make the shooting process far quicker and easier. You should set an upper limit but be generous if you want fast shutter speeds. Or your subjects in motion may end up being blurry. You’ll fine-tune this setting after some practice.
Metering and White Balance
For the Metering Method, you should set a shortcut to be able to change it on the fly. I have mine tied to the wireless button on the side. For the White Balance (WB), give a try to the Auto WB and Multi Auto WB options. Alternatively, use one of the presets like Daylight, Cloudy, etc.
Aperture
Which aperture size to use with the zone focus technique? If you want a shallow depth of field, use f/2.8. If you want a deep depth of field use anything between f/8 and f/16, the higher the better. Depending on the available light and your auto ISO settings, with narrow apertures like f/16, you may end up with slow shutter speeds. So keep that in mind when you’re photographing subjects in motion.
Exposure compensation
Now that our little GR III is ready to point and shoot, how do we correct exposure? Pretty easy: use the exposure compensation lever. Push it to the left, it will darken your photo. Push it to the right, it will brighten your photo. Depending on your settings it will increase/decrease the shutter speed (fixed ISO settings or Auto ISO upper limit reached) or the ISO (Auto ISO). So pay attention when you use it.
Go out and try it
Now take your camera for a little walk and see how useful and easy to use is the zone focus technique. You’ll switch between different subjects instantly. Don’t be surprised if you come home with much more photographs than usual and a big smile.
